Compiling AT91Bootstrap for the Aria G25
This post will describe how to compile your own AT91Bootstrap. AT91Bootstrap is a bootloader for the Atmel AT91 SoC like the Aria G25.
Why would you do this in the first place?
While trying to update Linux kernel I discovered that U-Boot had to be updated as well, because the GCC version had increased. Updating U-Boot made the U-Boot binary just slightly larger. This caused a problem with AT91Bootstrap. AT91Bootstrap loads bootstrap into memory, so it needs to know how large U-Boot is. So a new version of AT91Bootstrap must be compiled so it can load the new larger U-Boot.
Necessary setup
Buildroot is used to compile the rootfs, but it is also capable of compiling a linux kernel and various bootloaders. The buildroot used can be found here. This post assumes you have some idea of how this setup works. Still, the commands needed to setup the various containers are described below.
You need a container to store the build results and build cache. It can be created like this:
docker run -i --name buildroot_output advancedclimatesystems/buildroot /bin/ echo "Data only."
It is also assumed the latest image is build locally with the following command.
docker build -t "advancedclimatesystems/buildroot" .
Now that’s out of the way, let’s build a bootloader.
Menuconfig configuration
To see all existing configs run:
./scripts/run.sh make list-defconfigs
Since I am using the Aria G25, I am using the acmesystems_aria_g25_256mb_defconfig defconfig.
First launch the menuconfig using the docker container. This can be done like this:
./scripts/run.sh make acmesystems_aria_g25_256mb_defconfig menuconfig
This will open buildroot’s menuconfig. Open the bootloaders menu, from here the bootloaders can be configured. The default configuration uses AT91Bootstrap3, which is exactly what we need. U-Boot is disabled however. Since we want to boot to U-Boot from AT91Bootstrap it should be enabled.
AT91Bootstrap configuration
AT91Bootstrap has its own menuconfig. It can be opened using the following command:
./scripts/run.sh make at91bootstrap3-menuconfig
For some reason the default selected board will not compile. The evauation kit verion compiles fine though, so we’ll just use that one. To select a different board open the Board Type menu. Pick the at91sam9xeek board.
By default AT91Bootstrap is configured to start for an SD-card. I want to use the NAND on the Aria G25. This means we need to configure that as well.
Navigate to the memory selection menu. Change the Flash Memory Technology to NAND flash
To load U-Boot into RAM the Image Loading Strategy must be changed to Load U-Boot into last MBYTE of SDRAM
Thanks to our previous options, some new options have become available in the U-Boot Image Storage Setup menu. These options are needed to load U-Boot into memory. The first option is Flash Offset for U-Boot. It is the address on the NAND where the U-Boot image begins. The second option called U-Boot Image Size is the size of the U-Boot image on the NAND. These two options can differ per board, or even per U-Boot build. In my case, U-Boot is stored at 0x00040000, which is the same as the default.
My U-Boot image is slightly larger because I am using a custom build. So the U-Boot Image Size has to be increased. In my case it needed to be set to 0x00100000.
The last option is called The External Ram Address to Load U-Boot Image. It tells AT91Bootstrap to which address in memory the U-Boot image must be loaded. The default option of 0x22000000 is fine.
Compiling!
Now we are ready to compile! Unfortunately the build system does not copy our resulting image when just building AT91Bootstrap. So we need to build the whole thing, including the rootfs and kernel.
To compile everything, run the following command:
./scripts/run.sh make build
Go grab some coffee, because compiling might take a while.
After the build is done the resulting image can be found in the images directory. The only thing left to do is flashing the image to the chip.
Flashing the image
It is possible to write to the NAND from the Aria G25 by using sam-ba. I am using version 2.7 because the newer 3.x version see to have some issues running on my machine. The serial port of the Aria G25 must be connected to your PC.
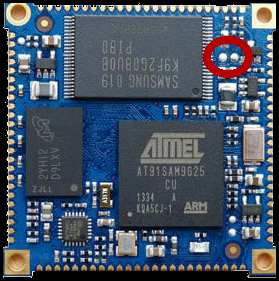
Before using sam-ba the Aria G25 must be put in the rom-boot mode. This can be done by shorting two pins on the chip shown in the image below.
If you’re using something like minicom you should see rom boot in the logs. Make sure to disconnect minicom now, only one device can use a serial port at a time.
Now that the chip is in rom-boot, run the following command with samba:
sudo sam-ba -p serial:ttyUSB0 -b sam9xx5-ek -a extram
This will initialize the memory of the chip. This command must always be run after putting the chip in rom-boot.
Now the chip is ready and the AT91Bootstrap image can be flashed. The command to do this is:
sudo sam-ba -p serial:ttyUSB0 -b sam9xx5-ek -a nandflash -c erase:0x0:0x40000 -c writeboot:at91bootstrap.bin; \
If your AT91Bootstrap image is larger than 0x40000 modify that part of the commando so that it is larger than your image.
Tada! The bootloader is now flashed onto the device. You should be able to boot normally now.
Final notes
During the flashing of the image, the original tpl (U-Boot) might be partially overwritten. This means that after booting to AT91Bootstrap the system halts. If that is the case, sam-ba can be used once again to flash U-Boot.
Set the system into rom-boot, initialize the memory. Now U-Boot can be flashed using the following command:
sudo sam-ba -p serial:ttyUSB0 -b sam9xx5-ek -a nandflash -c erase:0x40000:0xc0000 -c write:U-Boot.bin:0x40000; \